FileMaker WebDirect Help
FileMaker basics
About solutions
A solution is a file or set of files containing database tables, layouts, and scripts, and the associated data that you enter and work with. FileMaker WebDirect™ solutions contain records that can be opened from a web browser. The records consist of fields, which store and display the data. Each solution solves one or more specific problems, such as tracking customers or invoices.
Note: This document presents features available only when you're working with a FileMaker WebDirect solution from a web browser. For information on FileMaker® products, see the FileMaker Product Documentation Center.
What are fields?
Fields store, calculate, and display the data you have entered into a record. The information you enter into a field is its value. Field values can be text, numbers, dates, times, media files, and other files. Each piece of information in a record—like a name, address, or telephone number—is stored in a field.
What are records?
A record is a set of fields that contains data about a single activity, individual, subject, or transaction. To add data, you make a new record and enter data into the fields that belong to that record. After you create records in a file, you can edit them, sort them, or find a group of records that contain a particular value.
What are layouts?
Layouts display the records contained in a solution. The layouts—which are created by the solution designer using FileMaker Pro or FileMaker Pro Advanced—determine how data is organized for viewing, reporting, finding, and entering data. When you change data in a field in one layout, the change appears in every layout in which the field is displayed.
About working with FileMaker WebDirect solutions
You can view and work with data in a FileMaker WebDirect solution from a web browser in many ways. You can:
- see records in different layouts and views
- add, duplicate, edit, and delete records
- search for a subset of records
- sort to rearrange the records
- import and export records
- work with multiple file types, like picture files, audio files, and video files
Note: The solution designer or administrator may have disabled some features.
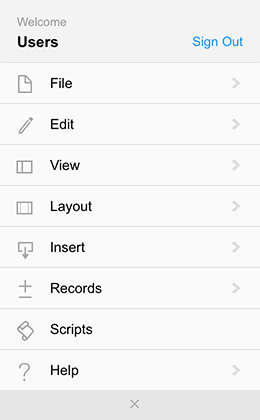
About the menu bar
The menu bar contains commands that allow you to work with your records, layouts, scripts, and accounts. To use a menu command, click ![]() and choose the command from the menu bar.
and choose the command from the menu bar.
Note: The File menu does not appear in mobile web browsers.
See also
About the status toolbar
The status toolbar contains controls and buttons that you use to perform tasks in FileMaker WebDirect. The controls and buttons on the status toolbar vary depending on the mode you're in and the width of the web browser window. Move the pointer over a button or control to see its description.
Note: If you don't see the status toolbar, click ![]() , then choose View > Status Toolbar.
, then choose View > Status Toolbar.


See also
About modes
You work with data in Browse or Find mode.
When you open a solution, FileMaker WebDirect displays the records in Browse mode. You can add, view, change, sort, omit (hide), and delete records when you are in Browse mode. When you are in Find mode, you can search for particular records that match a set of criteria.
Opening FileMaker WebDirect solutions
- In compatible web browser software, type the IP address or domain name where the solution is hosted, using the following format: http://<name>/fmi/webd
For example, http://www.MyCompany.com/fmi/webd - If you see the FileMaker WebDirect Launch Center, click the solution you want to open.
- If asked, enter an account name and password.
If you have an account stored by an OAuth identity provider, such as Amazon or Google, choose the OAuth identity provider. When the provider’s webpage opens, enter your account credentials.
Notes
- If the solution uses a custom homepage, follow the instructions provided by your solution designer.
- URLs for FileMaker WebDirect solutions and the FileMaker WebDirect Launch Center are case sensitive.
- You may need to sign in by providing an account name and password before you see the FileMaker WebDirect Launch Center or custom homepage.
See also
Signing out of a FileMaker WebDirect solution
When you finish working with a FileMaker WebDirect solution, sign out before closing the web browser window. Click ![]() , choose Sign Out, then quit the web browser application.
, choose Sign Out, then quit the web browser application.
Warning: Quitting the web browser before signing out of the FileMaker WebDirect solution may lead to data loss.
Important security considerations:
- If you use the web browser's Reload or Refresh button, FileMaker WebDirect creates a new connection to the host and loads the default layout, leaving the current session without signing out.
- When you open a FileMaker WebDirect solution from a web browser, you are connected to the solution, which might prohibit others from opening it. If you are not working with the solution, sign out.
- If the session times out, reopen the solution from the FileMaker WebDirect Launch Center.
Printing records
To print the current layout and found set, click ![]() , choose View > View as PDF, then use the web browser's controls to print the PDF.
, choose View > View as PDF, then use the web browser's controls to print the PDF.
Notes
- Specific printer and print setup options depend on the web browser, printer, and system software you're using. Refer to the printer and system documentation for more information.
- The web browser's pop-up blocker must be disabled to display PDFs.
Adding and viewing data
Switching layouts
Change layouts to view the data in a different arrangement. Click ![]() , choose Layout, then choose a layout.
, choose Layout, then choose a layout.
See also
Viewing records as a form or list
To view records individually (one record per screen) or in a list, click ![]() , then choose View menu > View as Form or View menu > View as List.
, then choose View menu > View as Form or View menu > View as List.
Adding records to the solution
You add or duplicate records in Browse mode. The new record becomes the last record in the found set.
- In Browse mode, click
 .
.
In narrow web browser windows, click , then choose New Record.
 - Click in a field and type the new information. Press Tab to move between fields.
You cannot add formatting to text you've entered—for example, bold or underline styles. FileMaker WebDirect doesn't support rich text. - When you finish entering information in the fields, click anywhere on the layout outside the current field to commit the record.
To duplicate a record, click ![]() , then choose Records > Duplicate Record.
, then choose Records > Duplicate Record.
Note: To enter data in fields that are on panel controls, select the panel that has the field, and enter the data.
Adding and removing content in container fields
To insert a file into a container field:
- Drag the file into the container field.
- Mobile devices: Click the container field, click
 , then choose Insert > Insert into Container.
Note: To view an image in its original size, click the container field, click ![]() , then choose View > View Full Size Image.
, then choose View > View Full Size Image.
To clear the contents from a container field:
- Click the container field.
- Click , then choose Edit > Clear.
Editing records
- In Browse mode, display the record to edit.
- Click in the field, and edit the data.
- When you finish entering information in the fields, click anywhere on the layout outside the current field to commit the record.
Deleting records
When you delete a record from the solution, you permanently discard the data that is entered in all the fields in that record.
To delete a record:
- In Browse mode, navigate to the record to delete.
- Click
 , then click Delete.
In narrow web browser windows, click, choose Delete Record, then click Delete.
To delete all records in the current found set, click ![]() , choose Records > Delete Found Records, then click Delete.
, choose Records > Delete Found Records, then click Delete.
To delete all records in the current table:
- In Browse mode, click
 or
or  , then choose Show All Records.
 - Click , then choose Records > Delete All Records.
- Click Delete.
Importing records
Note: This feature is not supported in mobile browsers.
FileMaker WebDirect can import data from these file formats:
- FileMaker Pro
- tab-separated values
- comma-separated values
- DBF
- merge
- Microsoft Excel (single-sheet files only)
To import data:
- Click , then choose File > Import Records > File.
- Click Choose File.
- Select the file that contains the data to import, then click Choose.
- Click Import.
- If you import from a FileMaker Pro file and your current account doesn't match an account in the FileMaker Pro file, you will be prompted for account information. Enter the account name and password for an account with the FileMaker WebDirect extended privilege enabled, then click OK.
- For each source field, choose a corresponding target field from the Target Fields column.
- In the Import Action area, choose the type of import to perform, and map fields in your file to the data you're importing.
- Click Import.
To import data from a source or format that is not supported, open the solution with FileMaker Pro.
See also
Exporting records
Note: This feature is not supported in mobile browsers.
FileMaker WebDirect can export data to these file formats:
- tab-separated values
- comma-separated values
- DBF
- merge
- HTML Table
Note: To export a summary field in a subsummary layout part, sort the found set before you export records.
To export data:
- Click , then choose File > Export Records.
- For Save As, type a name for the file.
- For Type, choose the export file type, then click OK.
- Click a field to export, then click Move. Repeat for all fields you want to export.
- Click Export.
- Click a button to download the corresponding file, then click Close.
FileMaker WebDirect exports records to the web browser's default download location.
To export data to a file format that is not supported, open the solution with FileMaker Pro.
Exporting container data
Note: This feature is not supported in mobile browsers.
- Click into the container field.
- Click , then choose Edit > Export Field Contents.
- To change the filename of the exported container data, for Save As, type a filename and file extension.
- Click OK.
- Click each button to download the corresponding file, then click Close.
FileMaker WebDirect exports the container data to the web browser's default download location.
Finding and sorting data
Performing a quick find
You can perform a quick find to search across all the fields that are enabled for quick find within the current layout.
- In Browse mode, type one or more words in the Quick Find box on the right side of the status toolbar.
In narrow web browser windows, click to display the Quick Find box.
 - Press Enter or Return.
To view a list of recent quick finds, click the down arrow in the Quick Find box.
Finding records
Use Find mode to locate records based on search criteria (the value or values to find). You type criteria into fields in a find request, which looks like a blank record. Find requests are created, edited, deleted, and navigated like records. FileMaker WebDirect searches through all the records in the solution, comparing your search criteria with the data in the file. Records with data matching the criteria become the found set, and are displayed in Browse mode when the search is complete.
To find a record or group of records:
- Click , then choose Enter Find Mode.
- Click , choose Layout, then choose a layout that contains the fields to search on.
- Click in a field you want to search on, and enter the search criteria.
- You can use
 to insert operators in your search criteria.
In narrow web browser windows, you must insert operators manually. - Click Perform.
In narrow web browser windows, click , then choose Perform Find.
The highlighted area of the pie chart indicates the portion of the total records displayed, and you see how many records were found.
Click or for details about the found set.
Creating search criteria
| To find values that are | Use | Example |
|---|---|---|
| An exact match, although the field may contain other values | = (before criteria) | =Smith finds all the records where the name is "Smith," including "John Smith" but not "Smithson" |
| Empty fields (for example, records of unfilled orders) | = | = finds all the records that have no values |
| An exact match, when the field contains no other values | == (before criteria) | ==Smith finds all the records where the name is "Smith" but not "John Smith" or "Smithson" |
| Duplicate values | ! (exclamation point) | ! finds all the records that have duplicate values in a field |
| Less than a specified value | < | <40 finds all the records that contain values less than 40 |
| Less than or equal to a specified value | <= | <=05:00:00 finds all the records that contain values less than or equal to 5:00 |
| Greater than a specified value | > | >05:00:00 finds all the records that contain values after 5:00 |
| Greater than or equal to a specified value | >= | >=Smith finds all the records that contain "Smith" and all records alphabetically after "Smith" |
| Within the range you specify | .. or ... (two or three periods) | 12:30 PM...7:30 PM finds all the records that contain values between 12:30 and 7:30 PM..Tue finds all the records that contain a date that occurs on a Sunday, Monday, or Tuesday |
| Within the range you specify (date, time, or timestamp fields) | Only the components that are necessary to identify the range | 5/2016 finds all the records that contain a date in May of 2016 |
| Within the sub-range you specify | {..} or {...} (two or three periods) | 11/{9..16}/2016 {3..5} PM finds records that contain a timestamp of November 9 through 16, 2016, from 3:00 PM to earlier than 6:00 PM |
| Within a range satisfying several criteria | A combination of operators | */{10..15}/2016 finds all the records that contain 2016, but only from the 10th through the 15th |
| Today's date | // | // finds all the records that have today's date |
| Invalid dates or times | ? | ? finds all the records that have invalid dates or times |
| One unknown or variable text character | @ | @on finds all the records that have three characters and end in "on," like "Don" |
| Digits in a text field (any one digit) | A # character for each digit | # finds 3 but not 30## finds 30 but not 3 or 300#3 finds 53 and 43 but not 3 |
| All valid values for a particular date or time component (date, time, or timestamp field) | * (representing an entire component, not an individual character) or leave the particular component unspecified | 5/12/* or 5/12 finds the 12th day of May in any year*:15 finds all times that are 15 minutes after any hour |
| Zero or more unknown or variable text characters | * | *smith* finds all the records that have "smith" in the name, like "Smithson," "Blacksmith" |
| Literal text in a field (useful for searching on characters like ",") | " " | ", Ltd." finds all the records that have ", Ltd." |
| Dates on a particular day of the week (date or timestamp field) | The full or short day name | Tuesday finds all the records in which the date occurs on a Tuesday=Thu 2016 finds all the records in which the timestamp is a Thursday in 2016 |
| Operators used as text characters | \ (before the operator) | joey\@abc.net finds "joey@abc.net" |
| Kana characters in a Japanese-indexed field without differentiating between Hiragana/Katakana, Voiced/Semi-Voiced/Unvoiced Kana, Small/Regular Kana, and Kana Voiced/Unvoiced Iteration Marks | ~ (tilde) and the character |
- To reset the found set to include all records while you are in Browse mode, click or , then choose Show All Records.
- You can further refine a search by constraining or extending the found set with additional find requests or omitting one or more records.
- When you perform day of the week searches on systems set to a system format other than English, you can use English day names and abbreviations.
Performing AND/OR searches
To perform an AND search, specify one find request using multiple fields. For example, you can perform a search where City = New York AND Name = Smith.
- Click , then choose Enter Find Mode.
- Click in the field you want to search, and type the search criteria.
For example, to find records where City = New York, click in the City field and typeNew York. - Click in the next field on which you want to search, and type the additional criteria (an AND search). For example, click in the Name field and type
Smith. - Repeat step 3 to enter all your search criteria.
- Click Perform.
In narrow web browser windows, click, then choose Perform Find.
To perform an OR search, where any search criteria is matched, you specify multiple find requests. For example, you can perform a search where City = New York OR Paris, or you can perform a search where City = New York OR Name = Smith.
- Click , then choose Enter Find Mode.
- Click in the field you want to search, and type the search criteria.
For example, to find records where City = New York, click in the City field and typeNew York. - Click
 to create a new find request.
 - In the blank find request, click in another field on which you want to search, and type the additional search criteria (an OR search). For example, click in the Name field and type
Smith. - Repeat steps 3 and 4 to enter all your search criteria.
- Click Perform.
In narrow web browser windows, click, then choose Perform Find.
Notes
- For multiple find requests, AND operations are evaluated before OR operations. For example, a complex AND/OR search with multiple find requests is evaluated as (City = New York AND Name = Smith) OR (City = Paris AND Name = Smith) OR (City = Paris AND Name = du Pont).
- Multiple find requests are performed in the order they are created.
- For search criteria using Omit (when your criteria does not equal data), specify search requests that omit records last. (First include all the records you want to find, then exclude the undesired records.)
- You can decrease or increase the number of records in the found set by constraining or extending the found set.
Finding records except those matching criteria
To find records that do not equal a specified value, you omit records that match the search criteria while performing a find. For example, to find all sales records except those for the city of London:
- Click , then choose Enter Find Mode.
- Type the search criteria for the records you want to omit (the records you do not want to find).
For example, typeLondonin the City field. - Click
 , then choose Omit.
 - Click Perform.
In narrow web browser windows, click, then choose Perform Find.
The found set excludes all the records that contain "London."
You can also find some records while omitting others. For example, to find vendors in the state of California except those in Los Angeles:
- Click , then choose Enter Find Mode.
- Type the search criteria for the records you want to find.
For example, typeCAin the State field. - Without performing the find, click .
- Type search criteria for the records in the found set to exclude.
For example, typeLos Angelesin the City field. - Click
 , then choose Omit.
 - Click Perform.
In narrow web browser windows, click, then choose Perform Find.
The found set includes all the records that contain "CA" except those that also contain "Los Angeles."
Notes
- You can have search criteria that omit records in more than one request.
- Multiple find requests are performed in the order they are created. For example, in a Contacts solution with clients in the US and France:
- If the first request finds all clients in Paris and the second request omits all clients in the US, the found set will not find records in the city of Paris, Texas, or anywhere else in the US.
- If the order of the requests is reversed (the first request omits all clients in the US and the second request finds all clients in Paris), the found set includes all clients in the city of Paris, France, and in the city of Paris, Texas, but no records for clients elsewhere in the US.
Omitting records from a found set and viewing omitted records
You can omit records from the found set after you have created the found set. Omitted records are still in the database; they just aren't included in the found set.
| To | Do this |
|---|---|
| Omit a specific record | Display or select the record to omit, click |
| Omit a series of records | Display or select the first record in a series of records to omit, click |
| View the omitted set and hide the current found set | Click |
| Bring back all the records in the database | Click |
Constraining (narrowing) a found set
You can narrow find results incrementally, looking for more specific detail as you search your database. To find records based on multiple criteria in separate fields (a logical AND search), switch to Find mode, specify the additional criteria, and constrain the find.
For example, after searching for all employees who work in Sales, you can constrain the search to find all employees within Sales named Alvarez.
- Perform a find so that your database contains a found set. See Finding records.
The found set is displayed in Browse mode. - Switch back to Find mode and type the criteria to narrow the search.
- Click the arrow next to Perform, then choose Constrain Find.
In narrow web browser windows, click, then choose Constrain Find.
Extending (broadening) a found set
You can expand your search to include additional applicable records without starting over if you have constrained a previous find request too much. To find records that match multiple criteria in the same or different fields (a logical OR search), switch to Find mode, specify the additional criteria, and extend the find.
For example, after searching for customers in New York, you can extend the search to also find customers in Hong Kong.
- Perform a find so that your database contains a found set.
See Finding records. - Switch back to Find mode and type the criteria to broaden the search.
- Click the arrow next to Perform, then choose Extend Find.
In narrow web browser windows, click, then choose Extend Find.
Sorting records
- In Browse mode, navigate to the layout that has the fields you want to sort by, then click
 .
.
In narrow web browser windows, click, then choose Sort Records. - In the Sort Records dialog box, select the first field to sort.
In mobile browsers, click Add a Field, then select the first field to sort.
For example, select Last Name. - Choose the sort order, then click Move.
In mobile browsers, select the field name, choose the sort order, then click OK.
You can only sort by fields that are in the current layout or that were included in the sort by the solution designer. - Repeat steps 2-3 for each sort field.
For example, choose First Name to sort that field after Last Name. - Click Sort.
After you sort records, the current record remains selected. In List View, the current record moves to its place in the sort order. To view the records in sorted order starting with the first record, click ![]() or
or ![]() , then drag the slider to the left.
, then drag the slider to the left.
To restore the records to the creation order, click ![]() , then choose Records > Unsort.
, then choose Records > Unsort.
Sharing a found set
Note: This feature is not supported in mobile browsers.
Snapshot links allow you to share a found set with a FileMaker Pro user. When you create a snapshot link, the current found set of record IDs—including the layout, view, sort order, mode, and toolbar visibility—is saved to a file. A FileMaker Pro user can open the snapshot link to view the found set. FileMaker WebDirect cannot open snapshot links.
A snapshot link does not preserve record data, and opening a snapshot link will not return record data to the state it was in when the snapshot link was created.
To create a snapshot link:
- Click , then choose File > Save > Snapshot Link.
- For Save As, type a name for the snapshot link.
- For Save, choose which records to share—the current record or the current found set.
- Click OK.
- Click a button to download the corresponding file, then click Close.
FileMaker WebDirect saves the snapshot link to the web browser's default download location.
Keyboard shortcuts
FileMaker WebDirect keyboard shortcuts
| To | Press |
|---|---|
| Specify an account name and password when opening a solution from the FileMaker WebDirect Launch Center | Windows: Alt as you open the solution macOS: Option as you open the solution |
| Commit the current record | Windows: Alt+Enter macOS: Option-Enter |
| Perform the current find in Find mode | Enter |
| Sign out of a solution | Windows: Alt+O macOS: Option-O |
Troubleshooting
Webpage doesn't display properly
Verify the following:
- JavaScript and cookies are enabled in the web browser. See your web browser's documentation.
- You are using a web browser that's supported by FileMaker WebDirect. Visit Visit the FileMaker website.
- Web browser plug-ins are installed for the media files used in the page. Web browser plug-ins may provide support for documents, animation, images, audio, and movie files. These media files may not display correctly if specific web browser plug-ins are not installed.
- Parental controls are disabled. See your operating system's documentation.
Can't find a feature
Verify the following:
- The status toolbar is showing. Click , then choose View > Status Toolbar.
- You are working in the correct mode. For example, you can create new records only in Browse mode.
- The feature was not intentionally disabled by the solution designer.
- The account you are using allows access to all the features you need. See your solution designer.
Can't go backward or forward in a web viewer
Use your web browser's shortcut menu to go backward or forward in a web viewer. Right-click (Windows) or Control-click (macOS) within a web viewer, then choose Back or Forward.