Claris FileMaker Custom App Upgrade Tool Guide
Overview
The Claris™ FileMaker® custom app upgrade tool applies schema, layout, or script changes to a FileMaker Pro™ (.fmp12) file. This command-line tool is available in Windows and macOS.
Note:This tool is provided as a developer preview.
Common use cases for the upgrade tool are:
- A customer wants to upgrade to a newer version of your app but doesn't want to lose, or can't migrate, their data and their schema or layout customizations from their file to a new file.
- A developer requests a customer to apply a temporary debug patch to an app to track down or mitigate an issue the customer is having.
- A developer wants to provide a critical bug fix to all customers.
- A developer wants to remove sensitive debug data or functionality that was not intended for distribution to customers.
The best practice for using the upgrade tool is to provide quick, short-term fixes to problems between full releases of an app. This approach keeps the patch file relatively simple and primarily for adding objects to an app. For full releases of an app or to add or modify objects and properties not supported by the upgrade tool, use the FileMaker data migration tool instead.
Terms used in this document:
- source file: An FMP12 file to be upgraded.
- destination file: A copy of the source file that has been upgraded using a patch file.
- patch file: An XML file that specifies the actions (add, delete, and replace) to perform on the source file. The root element is FMUpgradeToolPatch. A patch file may be plaintext or encrypted.
- FMSaveAsXML file: An XML file created via the Save a Copy as XML command or script step in FileMaker Pro. This file is an XML representation of the FMP12 file it was saved from. The root element is FMSaveAsXML. You use this file to help create a patch file.
- object: An element in an FMSaveAsXML file or patch file that describes an individual item in a FileMaker Pro file—for example, a field, table, script, script step, layout, or layout object.
- catalog: A collection of objects in an FMSaveAsXML file or patch file.
- *Name element: Any XML element name with the Name suffix. For example, *Action element refers to an AddAction, DeleteAction, or ReplaceAction element.
Notes
- The upgrade tool does not support migrating, adding, modifying, or deleting record data, including externally stored container data.
Typical workflow

- Because a patch file that deletes or modifies existing objects must reference those objects with globally unique identifiers (GUIDs), you must run the upgrade tool with the
‑‑generateGUIDssubcommand on the original version (v1) of your app before you distribute it to customers. This operation adds GUIDs to any objects that don't have them. - After you develop version 2 (v2) of your app, use the upgrade tool to generate GUIDs in v2 of your app. Then in FileMaker Pro, choose Tools menu > Save a Copy as XML or use the Save a Copy as XML script step to create an FMSaveAsXML file of both versions of your app. Compare the v1 and v2 FMSaveAsXML files and use that information to create a patch file. See Creating a patch file.
- After you create the patch file, use the upgrade tool to validate the file and fix problems until it's valid. Optionally, you can then encrypt the patch file (see Securing an upgrade). Next, thoroughly test your patch by applying it to a copy of v1 of your app and verifying that the changes in the destination file are valid.
- You can write a script that fully automates upgrading your app. Package the script, upgrade tool, and patch file so that the user only needs to run the package. Thoroughly test your package by running it with a copy of v1 of your app and verifying that the changes in the destination file are valid.
- Distribute the upgrade package to your customers. In your instructions to customers, include that the app must be closed before it can be upgraded.
About the patch file
The structure at the top level of the patch file is:
<?xml version="1.0"?>

<FMUpgradeToolPatch>

	<Structure>

		<!-- One or more *Action elements -->

		<AddAction> ... </AddAction>

		<DeleteAction> ... </DeleteAction>

		<ReplaceAction> ... </ReplaceAction>

	</Structure>

	<Metadata>

		<!-- One or more *Action elements -->

		<AddAction> ... </AddAction>

		<DeleteAction> ... </DeleteAction>

		<ReplaceAction> ... </ReplaceAction>

	</Metadata>

</FMUpgradeToolPatch>
The FMUpgradeToolPatch root element indicates that this file is intended for the upgrade tool to use as a patch file. This distinguishes the file from the similar FMSaveAsXML file, which is not intended to be used unmodified with the upgrade tool.
The child objects of FMUpgradeToolPatch are:
- Structure: Contains actions to perform on the catalogs and other elements that describe the structure of the file.
- Metadata: Contains actions to perform on anything that isn't a database catalog—for example, settings in the File Options dialog box.
The *Action elements specify what objects or catalogs to add, delete, or replace and can be used under Structure or Metadata.
| *Action element | Description | Support |
|---|---|---|
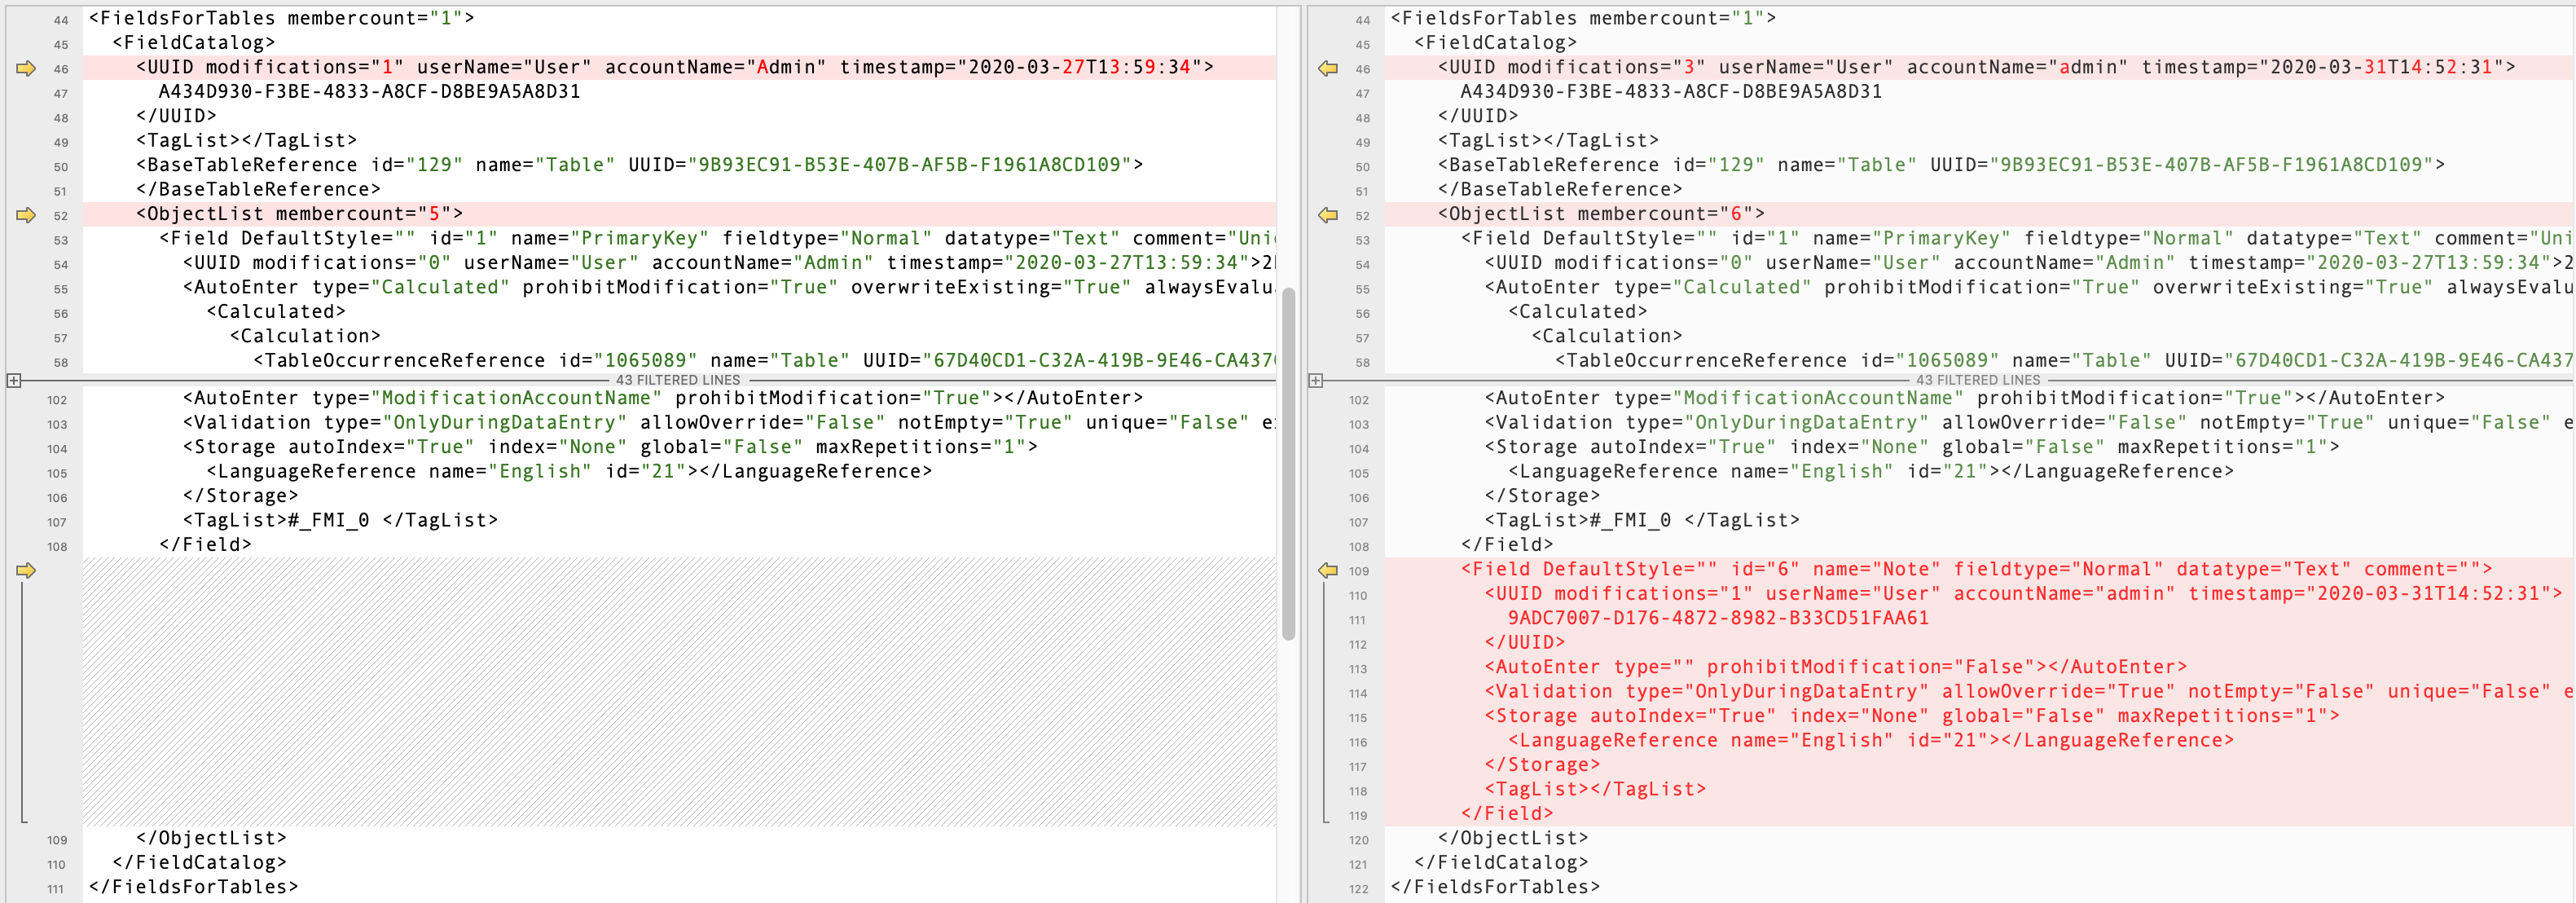
| AddAction | Adds new objects. To add an object, use the element name for the object's catalog and specify the UUID for the catalog and object. For example:
Under AddAction, use the catalog's element name. Under the catalog element, include the UUID element and reproduce the structure down to the specific object to be added. Some catalogs have ObjectList elements with a child element for each object, others don't. Under a single AddAction element, you can add multiple objects by including multiple objects under a list element like ObjectList. Refer to the FMSaveAsXML file for the structure to include. Also, see the example in Creating a patch file. |
In an FMSaveAsXML file, most children of the Structure element are catalogs. Generally, any of their children are supported objects that can be added with this action in a patch file. Adding sub-objects to existing container objects is not supported, except for FieldsForTables and StepsForTables. Saved finds are not supported. The following data formatting options are currently not supported:
|
| DeleteAction | Deletes objects or entire catalogs. To delete an object in a catalog, use the ItemReference element and specify the UUID and type attributes. For example:
Note:All references must have UUIDs; otherwise, the action isn't performed. To delete a catalog, use the CatalogReference element and specify the catalogName and uuid attributes. For example:
Where supported, deleting a catalog will try to delete all user-created objects in the catalog; predefined objects—for example, the Full Access, Data Entry Only, and Read-Only Access privilege sets—won't be deleted. |
Only these high-level objects (and their containing objects) in the XML structure are supported:
All catalogs are supported, except AccountsCatalog. |
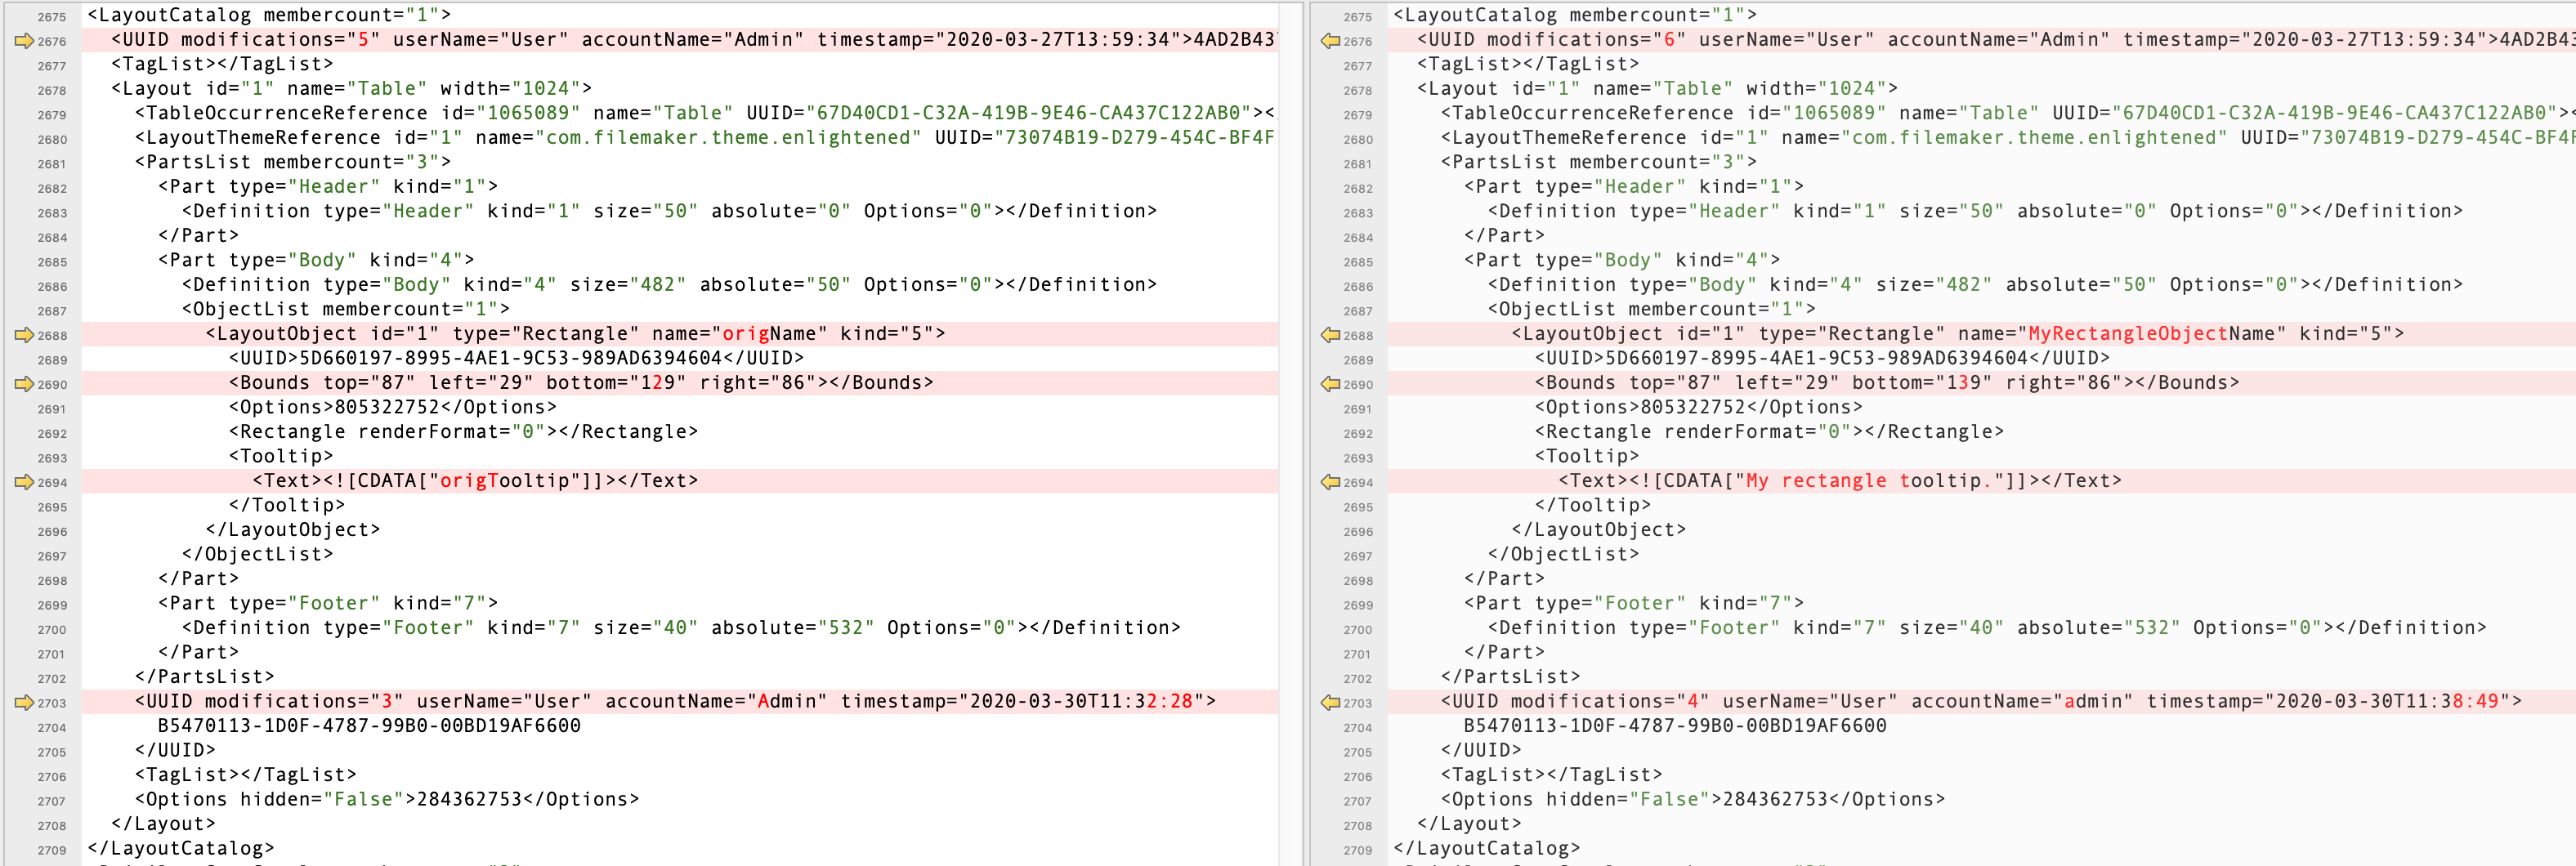
| ReplaceAction | Modifies existing objects and their containing objects. In general, an object can have only its properties replaced, not its children. Therefore the XML that describes a containing object must not contain an ObjectList element—if it does, ReplaceAction will result in undefined behavior. One exception to this rule is replacing an entire layout; in this case, the XML describing the layout should be complete, as when using AddAction. To replace a sub-object, this action must refer to the sub-object specifically. For example, to replace a field layout object in a portal, don't attempt to replace the portal; replace only the field object. To replace an object, use the Replace element and specify the type and UUID attributes. For example:
Within the Replace element, specify the object and its properties. See the example in Creating a patch file. Note:All references must have UUIDs; otherwise, the action isn't performed. |
Only high-level objects (and their containing objects) in the XML structure are supported. For LayoutObject elements, only those with the following type attributes can have their basic properties modified with ReplaceAction:
Changing a layout object to a different type or changing the layout it's on is not supported. |
Creating a patch file
Creating a plaintext patch file starts with comparing the FMSaveAsXML files of two versions of your app. Based on the differences, you create a plaintext patch file (with the root element FMUpgradeToolPatch) that implements the changes to apply to the earlier version of your app. The upgrade tool doesn't provide an automated way to create a patch file.
Prerequisites:
- Before you distribute v1 of your app, run the upgrade tool with the
‑‑generateGUIDssubcommand to ensure all objects in the file are assigned GUIDs.
To create a patch file:
- With v2 of your app as the source file, run the upgrade tool with the
‑‑generateGUIDssubcommand. -
In FileMaker Pro, open v1 and v2 of your app and create an FMSaveAsXML file from each.
Either choose Tools menu > Save a Copy as XML or use the Save a Copy as XML script step.
- Use your preferred file comparison tool to locate the differences in the two FMSaveAsXML files.
- Create a plaintext patch file with the top-level structure shown in About the patch file.
- For each relevant change to a catalog or object that you found in step 3, add an *Action element to the patch file as described above.
Use an iterative approach of making changes in the source file, saving a copy as XML, learning what XML you need to include in your patch file, applying the patch, validating the changes in the destination file, and repeating until you get the desired result.
Example 1: AddAction
Example 2: ReplaceAction
Example command usage
Securing an upgrade
Credentials for a FileMaker file account are required when you run the upgrade tool with certain subcommands—for example, ‑‑update. This account is used to determine whether the user has permission to perform the upgrade tool subcommand on the file, but this account does not restrict what the upgrade tool can do when it performs the subcommand. For example, an account that permits the user to use the upgrade tool but doesn't have privileges to modify a layout can still apply a patch that modifies a layout.
Depending on your security requirements, you can also choose whether to use a plaintext or encrypted patch file.
Plaintext patch file
Encrypted patch file
Command-line parameters
Note:Before you run the upgrade tool on a source file, be sure the source file is closed.
Usage: FMUpgradeTool <Subcommand> [<other options>]
| Subcommands | Description | ||||||||||||||
|---|---|---|---|---|---|---|---|---|---|---|---|---|---|---|---|
| ‑‑help | Displays help. | ||||||||||||||
| ‑‑version | Displays the version of the upgrade tool (major.minor.update.build). The major version number corresponds to the Claris FileMaker Platform version. The other numbers describe the specific version of this tool. | ||||||||||||||
| ‑‑update | Updates a FileMaker Pro file based on a patch file with these options:
|
||||||||||||||
| ‑‑validatePatch | Returns an error if the specified patch file is not valid. Can be used to test both plaintext and encrypted patch files. Uses these options:
|
||||||||||||||
| ‑‑encryptPatch | Encrypts a plaintext patch file for secure patching. Uses these options:
|
||||||||||||||
| ‑‑decryptPatch | Decrypts an encrypted patch file. Uses these options:
|
||||||||||||||
‑‑generateGUIDs |
Generates a globally unique ID (GUID) for each object that doesn't have one, ensuring each object has a GUID that can be referenced by a patch. Uses these options:
|
||||||||||||||
| ‑‑regenerateGUIDs | Regenerates new GUIDs for all objects. Uses the same options as ‑‑generateGUIDs. |
These options can be used with any subcommand:
| Options | Description |
|---|---|
| ‑force | Overwrites an existing output file. |
‑inplace |
Modifies the source FileMaker Pro file in place rather than create a copy. If you use this option, ‑dest_path is ignored. |
| ‑v (verbose mode) | Provides details about the upgrade process. Outputs the subcommand and options used, but not a password or passkey. |
| ‑q (quiet mode) | Outputs minimal information. |
Example:
FMUpgradeTool ‑‑update

	‑src_path ./MySourceApp.fmp12

	‑src_key MyEncryptionPassword

	‑src_account Admin

	‑src_pwd MyAdminPassword

	‑patch_path ./MyPatch.xml

	‑dest_path ./MyPatchedApp.fmp12
Notes
- If the file specified by
‑dest_pathalready exists, an error is returned and the operation is terminated unless‑forceis used. If‑dest_pathisn't specified, a suitable path and filename will be generated. - The upgrade tool returns an integer to the shell that calls it: zero (0) when it is successful, a non-zero number when there is an error. For the meaning of an error, see the error message that the tool outputs.