Using graphic rulers and ruler gridlines
You can use graphic rulers and ruler gridlines to help you align and position objects precisely on a layout.
|
•
|
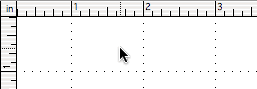
Graphic rulers: Showing the graphic rulers displays a horizontal and vertical ruler along the edge of a layout. Guide lines on each ruler track the position of the pointer as you move the pointer on the layout
|
|
•
|
Ruler gridlines: Showing ruler gridlines displays a dotted-line grid on a layout that you can use for positioning objects. Ruler gridlines do not print, but they do adjust when you change the unit of measure of the graphic rulers.
|
|
1.
|
|
2.
|
In the Set Rulers dialog box, for Units, choose a unit of measure.
|
The unit of measure you choose affects the graphic rulers and gridlines, text ruler, and the Info palette.
Note The Grid spacing option in this dialog box affects the object grids, not the visible ruler gridlines. For more information, see Using the object grids.
|
3.
|
Click OK.
|
FileMaker Pro saves the unit of measure with the document. Each ruler and gridline increment measures the following amount of space:
|
•
|
You can temporarily change the unit of measure used by the graphic rulers, ruler gridlines, and text ruler by clicking the box in the upper-left corner of the document window where the horizontal and vertical graphic rulers meet.
|